


Experiments with electronics
An inexpensive electronic North-South Pole Indicator
If you wanted a simple circuit that will tell you the polarity of a magnet, this is for you. It uses a Hall-Effect device to measure the magnetic field and its polarity. The polarity is then indicated with one of two LEDs being turned on. Red is for a North pole, Green is for a South pole. There is a small dead-band so that neither light is on when no magnetic field is present. There is also a zero adjustment you can make to center that dead-band.
Here is the schematic of the circuit.
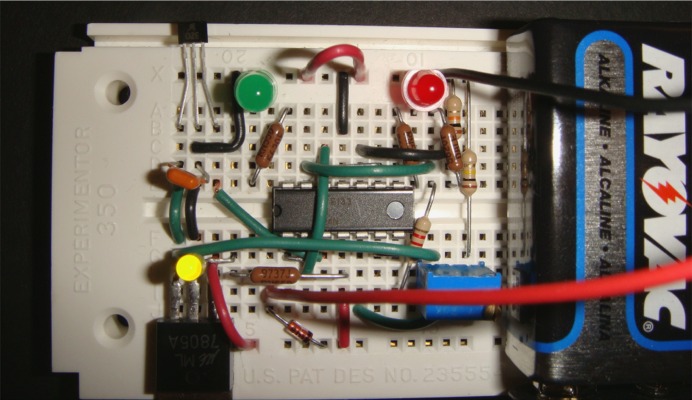
These photos show the circuit connected using a breadboard - making it easy to troubleshoot, measure, modify.

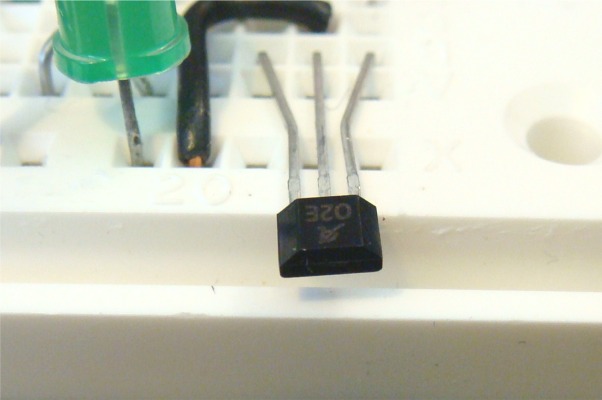
Hall Effect Device Connection
This shows how the face of the Hall Effect Device is oriented so that the polarity indicated will be for the side of the magnet touching this top face of the device.
Parts List
Here is a list of parts used for the inexpensive North-South Pole Indicator described above and as shown in the photos.
Description |
Qty |
P/N |
Approximate Cost, each |
| 9v Battery | 1 | 8.99/4 | |
| Linear
Hall Sensor, 1.3mV/G A1302EUA-T |
1 | 31K6639 (Newark) | 0.98 |
| 7805 Voltage Regulator or LM78L05ACZ, 5V, 100mA voltage regulator |
1 | 276-1770A (Radio Shack) 89K1302 (Newark) |
1.49 0.16 |
| 324 Quad Op
Amp LM324AN |
1 | 276-1711 (Radio
Shack) 89K0690 (Newark) |
1.29 0.20 |
| 0.1uF Cap | 2 | 272-135 (Radio Shack) | 0.69/2 |
| 10K, 15 turn
Pot MCWIW1012-1-103-LF |
1 |
271-343 (Radio Shack) 05N1554 (Newark) |
1.49 0.47 |
| Breadboard, EXP-350 | 1 | 276-169 (Radio Shack) 17C6901 (Newark) |
21.99 5.95 |
| 1N4148 Diode | 1 | 276-1122 (Radio Shack) | 1.49/6 |
| Red / Green LED, 2.2V, 20MA | 1 | 09J9301 (Newark) | 0.32 |
| Yellow LED, 2.2V, 20MA | 1 | 58K2488 (Newark) | 0.13 |
| Wire, 22AWG solid | 1 | 278-1221 (Radio Shack) | 4.49/3 rolls of 90' each |
| Resistors, 1/8w or 1/4w | 1 | 271-312 (Radio Shack) | 7.99 for 500 piece assortment |
| 560 Ohm Resistor | 4 | ||
| 8.2K Ohm Resistor | 1 | ||
| 10K Ohm Resistor | 1 | ||
| 51K Ohm Resistor | 1 |
You may want to first make sure everything works correctly using a breadboard, such as the one from Radio Shack, P/N 276-169. It costs about $21.99, but can be used over and over for all of your new projects as well. The one from Newark is smaller, but still very useful. The bundle of resistors listed above gives you a nice selection of 5% resistors to work with. If you have trouble finding any of the items, take a copy of this page to a Radio Shack store and they could certainly help find the parts. Instead of a single LED with two colors, you can easily use two single LEDs - one red and the other green. Don't forget to check the 324 Op-Amp pin-outs so you connect each section correctly.
Calibration
When no magnet is near the Hall-Effect Sensor, put a jumper around the resistor as shown in the schematic. Then, adjust the 10-Turn pot so that both LEDs are off. Now, remove the jumper and you are set to go.
Operation
Place a magnet near the Hall-Effect Sensor, and either the Red or Green light will be on. Red is a North pole, Green is a South pole.
If you slide a flat refrigerator magnet across the sensor, you may see it alternate red-green-red-green- etc because it is magnetized with alternating bands of polarity. This helps make it stick to the steel surface of the fridge door better.
Have fun!