Magnet basics
What affects the strength of a magnet?
Material
As seen in the previous section, and copied below, the material the permanent magnet is made from has a significant effect on the overall strength of a magnet. The material will also determine how its flux is affected by temperature, and how easily the magnet can be demagnetized by opposing magnetic fields.
There are four classes of permanent magnet materials:
Neodymium Iron Boron (NdFeB or NIB)
Samarium Cobalt (SmCo)
Alnico
Ceramic or Ferrite
This table gives us some of the special characteristics of the four classes of magnets.
Br
is the measure of its residual magnetic flux density in Gauss, which is the maximum flux the magnet is able to produce. ( 1Gauss is like 6.45 lines/sq in)| Material | Br | Hc | BHmax | Tcoef of Br | Tmax | Tcurie |
| NdFeB | 12,800 | 12,300 | 40 | -0.12 | 150 | 310 |
| SmCo | 10,500 | 9,200 | 26 | -0.04 | 300 | 750 |
| Alnico | 12,500 | 640 | 5.5 | -0.02 | 540 | 860 |
| Ceramic or Ferrite | 3,900 | 3,200 | 3.5 | -0.20 | 300 | 460 |
Temperature
The temperature coefficient column indicates how the magnetic flux varies with the temperature of the magnet.
Experiment ![]()
Let's do an experiment to show the effect of temperature on magnets.
The goal will be to measure the flux density of the magnet when it is at three different temperatures, and compare the measurements. Here are some ideas:1. From the above table, you can find Tcoef of Br and Tmax for four types of permanent magnet materials for background information.
2. What would be needed to perform this test?
a. Select two or three magnets. They could be the same type or different types of material. I would not use SmCo or Alnico since they don’t vary much with respect to temperature. Instead, I would use a Ceramic magnet, or a NdFeB (rare earth) magnet. We won’t have to worry about exceeding their maximum temperatures, and their change in flux density as a function of temperature is relatively great. It is best to use two or three samples to give you better results. Contact Radio Shack at www.radioshack.com or The Magnet Source at www.magnetsource.com or Arbor Scientific at www.arborsci.com or Edmund Scientifics at www.scientificsonline.com for the type of magnet you want.
b. Obtain a meter to measure the flux density of the magnets (Gaussmeter). This can be built from the instructions I provide, or can be purchased from The Magnet Source at www.magnetsource.com as P/N GM1A and probe GM1APT70 (about $450 total).
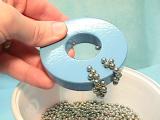
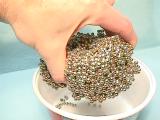
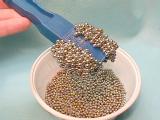
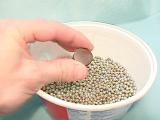
What if you don’t have a way to get or make a Gaussmeter? Well, you could try seeing how many tiny nails or staples or small steel ball bearings the magnet can pick up, and try to obtain a comparison of flux density from that. If the magnet can pick up and hold 22 nails, end to end, when before it could only pick up and hold 20, then you have a 10% increase in flux density. Or, instead of placing the nails end to end, see how many nails can be stuck to the magnet all over its surface. Another way to measure strength would be to place a paper clip a certain number of mm away from the magnet and see if the magnet will pull the paper clip toward itself. By measuring the mm between the magnet and the paper clip where it will pull it across the surface of a smooth table, would be a measure of its flux density. Another way would be to attach a flat headed screw to the magnet, and use a small scale to see how much pull is required to pull the screw from the magnet. More pounds of pull means more flux density. As long as you make comparisons using the same method, you should get reasonable results. If you have a bunch of small steel ball bearings (about 1/16" diameter), see how many will stick to the whole surface of the magnet when doing the test.
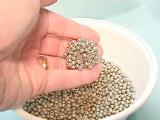

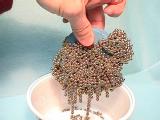

These photos show a bunch of zinc plated steel BB's (about 1/8" in diameter) I bought at a sporting goods store (about $4 for 3000 of them!), stuck to different magnets. I had a lot of fun just playing with the magnets in the BB's. Smaller balls (like steel shot for shot-gun shells) would give you a more accurate result, but these larger ones were easier to handle.
c. Get three temperature baths ready. They don’t have to be ready at the same time. The experiment can be done with hours or days or weeks in between the measurements taken in each of the three temperatures baths.
0° C is made by filling a styrofoam cup with ice and adding just enough water to cause the ice to start to float. Stir the ice water to get an even temperature. In about 10 minutes, the water will be cooled to 0° C and will stay there until all the ice is melted. Keep the magnet totally submersed in the ice water for 15 minutes before removing it to perform the flux test.
100° C is made by boiling water on a stove. When bubbles start to appear, the water is at 100° C and will stay there until all the water is evaporated. Keep the magnet totally submersed in the boiling water for 15 minutes before removing it to perform the flux test.
-196° C is made by using liquid nitrogen. This should be available from hospital supply stores. This must be handled carefully in order to prevent frost burns to the skin (see http://sprott.physics.wisc.edu/demobook/chapter2.htm). When an object is dipped into liquid nitrogen, a lot of bubbles will be seen. When the rapid bubbling stops, the object has reached -196° C. Keep the magnet totally submersed in the liquid nitrogen for 2 minutes after the rapid bubbling stops, before removing it to perform the flux test.
If it is too difficult to obtain liquid nitrogen, get some dry ice from a local supplier (check the yellow pages). This will be a -78° C bath. Again, handle only with gloves, not with your bare hands! Place the magnet between two blocks of dry ice for about 15 minutes before removing it to perform the flux test.
3. Now, you will need to measure the flux density of the magnet when its temperature is at 0° C (temperature of freezing water).
a. This may not be super easy since the distance between the magnet and the probe measuring the flux density has a big effect on the measurement, as well as the position of the probe to the edge of the magnet. Mark one face of the magnet with a dot using a permanent marker so you measure the same pole each time. Set up a fixture to hold the magnet and probe in the same position each time a measurement is taken, insuring a fairly repeatable, reliable reading. If the magnet is too strong for the meter, place a piece of plastic or wood between them as a spacer so the meter can read a lower flux density. (Don’t forget that the measurement will increase by about 24 to 40 % when it gets cold.) Call this measurement G2.
b. If you are using the ball bearing method of measuring flux density, place the magnet, using non-magnetic tweezers (plastic or brass or stainless steel), into a dish filled with the small steel ball bearings. Lift the magnet out with all of the ball bearings stuck to it, and place it into a separate bowl. When the magnet reaches a temperature you can handle, pull off the ball bearings still stuck to it and count how many were stuck to it. Call this measurement G2.
4. Then, if the temperature is increased from 0 to 100° C (temperature of boiling water), the flux density (Gauss) of the magnet would be decreased, so that you would be left with approximately the following % of the flux density when originally measured at 0° C:
| Material | Flux density at 100° C compared to 0° C (G3/G2) |
| NdFeB | about 89% |
| SmCo | about 96% |
| Alnico | about 98% |
| Ceramic | about 83% |
So, place the magnet into the boiling water and wait 15 minutes to make sure it is nice and hot. Perhaps you could shape some aluminum foil to hold the magnet in the water and lift it out with it, too. The magnet might otherwise like to stick to the metal pan. If the pan is stainless steel, the magnet may not stick to it. Check this out before you start to boil the water. Place the magnet into the same fixture you used for the 0° C measurement. Call this G3.
5. Now, if the temperature were decreased from 0 to -196° C (temperature of liquid nitrogen), the flux density of the magnet will be increased, so that you would see approximately the following % of the flux density when originally measured at 0° C:
| Material | Flux density at -196° C compared to 0° C (G1/G2) |
| NdFeB | about 124% |
| SmCo | about 108% |
| Alnico | about 104% |
| Ceramic | about 140% |
So, place the magnet into a styrofoam bowl and slowly pour liquid nitrogen into the bowl, covering the magnet. After about 2 minutes, the rapid boiling will stop, indicating the magnet is now at -196° C. Carefully lift the magnet out of the liquid nitrogen using plastic tweezers and place it into the same fixture used for the other measurements. Call this G1.
If dry ice is used instead of liquid nitrogen, let the magnet sit between two blocks of dry ice for 15 minutes before taking the flux measurement. Please note that the change in flux density will not be as great as with liquid nitrogen because the temperature is only -78° C instead of -196° C.
6. Great, now you have the data. Let’s plot G1, G2 and G3 vs temperature for each magnet. (Another data point can be obtained by performing the flux measurement at room temperature. It would be between G2 and G3 in value since a typical room is at 72° F which is 22° C.
Then figure the temperature coefficient by taking:
(G3-G1)*100/(G3*(change in temperature from G3 measurement to G1 measurement)) = % per degree C
For example, if G1 = 87 ball bearings at -78 C, and G3 is 61 ball bearings at 100° C,
then the Tcoef =
(61-87)*100/(61*(100-(-78))) = (-26)*100/61*(178) = -0.239% per degree C.
Compare the shapes of the curves when you join the data points with lines for each magnet. Are they different for different materials? Do they have the same slope? Are they the same for the same materials having different shapes? Do the plots have the same slope?
7. One more thing can be done with the magnets. If the temperature is increased above the Curie Temperature, as shown in the first chart above, the magnet will lose its magnetism. When it cools, it will take on some magnetism, depending on what it is near when it cools. In order to get close to 310° C, you would need something like a propane torch used for soldering copper plumbing pipes together in houses. Boiling water is far from that, so this is not a problem. However, if you want to prove the Tcurie, try heating the magnet with a propane torch (realizing you will destroy its magnetism) and do the flux test after it cools off.
8. Write up your expectations, your experimentations, and your results for your report. For the bibliography, don’t forget to note the internet references used for the data in the table in step 1, as well as this Magnet Man source. Then, drop me a line telling me how well it went and any improvements you made along the way.
Demagnetizing fields
The Hc column in the data table above indicates the strength of a magnetic field which can demagnetize a magnet. The magnet would have to be subjected to it in an opposing or repelling manner.
Experiment ![]()
1. Obtain samples of ceramic magnets, alnico magnets and a NdFeB magnet. Mark the North pole on each magnet (use a compass to determine which is the N end of each magnet. Remember, the South end of the compass will point to the North pole of your magnet).
2. Measure the strength of the flux using the same method suggested above for measuring temperature affects. Write down your observations. Then check the polarity of the magnet using your compass. Write down your observations.
3. Take the NdFeB magnet and place it against the ceramic magnet, North pole against North pole. Leave it there for a day. Tape or rubber-band the magnets together to keep them in that position. Do the same thing with the alnico magnet and the NdFeB magnet the next day.
4. Measure the strength of the flux for each magnet again and note the difference. Also check its polarity. Write down your observations.
5. Now, take the NdFeB magnet and place its South pole against the marked North pole of the ceramic magnet. Leave it there for a day. Do the same thing with the alnico magnet and the NdFeB magnet the next day.
6. Again, measure the strength of the flux for each magnet and note the difference. Also check its polarity. Write down your observations.
7. You should see that the flux measurement for the NdFeB magnet does not change. However, the ceramic and alnico will change greatly. The poles of the alnico magnet may even become reversed in step 3.
Physical impact
Magnets can become demagnetized by physically hammering or dropping them when the poles of the magnet are opposite to the poles of the earth, or at right angles to the poles of the earth. Steel nails can also become magnetized when hammered when the nail is lined up with the poles of the earth.
Experiment ![]()
1. Take a steel rod, such as an unused pin from a door hinge or a large nail.
2. Check to see if it has any affect when a compass is brought near it. Write down your observations.
3. Line it up in the North-South direction, sitting on a piece of 2x4 wood.
4. Hit it 50 times with a hammer.
5. Check it again to see if it has any affect on a compass. Write down your observations.
6. Turn the pin around so that it is lined up opposite to what it was in step 3.
7. Hit it 50 times with a hammer.
8. Check it again to see if it has any affect on a compass. Write down your observations.
9. Turn the pin so that it is now lined up in an East-West direction and hit it another 50 times with a hammer.
10. Check it again to see if it has any affect on a compass. Write down your observations.
11. You should see that if unmagnetized to begin with, it will become magnetized in one direction in step 5, magnetized in the opposite direction in step 8, and demagnetized in step 10.
For more information:
For more information, please check this.